Arwen’s Chase Dress, Lord of the Rings, The Fellowship of the Ring
Chase Sequence
‘Flight to the Fords’


By Leaves of Lorian
YAE!!! I FINALLY GOT TO MAKE MY CHASE GOWN!!!!
(can you hear me screaming?!)
I’m really only mildly excited….
YAE!!!!! YAE!!! YAE!!!
Back when I first decided to do a Lord of the Rings replica gown, I knew I wanted to do one of Arwen’s. I just didn’t know which one. I spent quite a while looking over her different gowns before I finally picked the one I wanted to make the most -- her chase gown.
Unfortunately, the more I researched this gown, the more I realized that for someone who’s only costuming project up to that time had been Legolas ….
I was not ready to do the Chase gown.
I forget where I read it, but somewhere someone referenced the costume depart of LOTR saying Arwen’s chase gown was the most difficult of all her dresses to make. Every panel of the dress is a different thickness of suede, and not only that, but the grain was going in a different direction on every panel!!
(supposedly it’s because they wanted this dress to make her seem as elvishy as possible when we first meet her by providing a very different look. She is the first elf we meet in the films, after all, so it make sense cinematically)
It’s also dove gray suede, which is very expensive. So for the time being the chase gown was out. (very sad face)
I did Arwen’s Battle Dress instead…which was (in my humble option) not much of a step down!!


(Battle Gown) (Chase Gown)
But now…the time has come…the moment of truth…the utter delight of a long awaited chance…IT’S HERE!!!!
YAE!!!!
THE GOWN
Please, please please ….do not confuse Arwen’s CHASE gown with her BATTLE dress.
One is gray and looks blue, and is worn in the Fellowship of the Ring for the Flight to the Fords sequence with Frodo and the Ringwraiths on the horses. She is chased in this dress. She does not battle in it.


The other is wine, burgundy, pink and gold and was used in the alternate storyline in The Two Towers (which was filmed then cut) where Arwen went to Helm’s Deep with Haldir and fought there. She actually battled in this dress.


(I have blogs for both dresses, so be sure that ‘This is the dress you’re looking for’!!!)
I think the confusion comes in when people are unaware of the cut sequences from all three films.
Anyhow..
BREAKDOWN TIME!!
The chase dress has multiple parts, like any of Arwen’s dresses; the coat/overdress, the skirt/underdress, the gloves, the belt/buckle, the boots, the breeches, and the sword….which technically is not part of the dress.
Hadhafang aside, I’ll tackle this one part at a time.
The coat/overgown
(I will call it the coat) Is many different pieces.
The more I look at this dress, the more crazy it seems - Honestly! But here goes:
The ‘bodice’ and ‘skirt’ of the coat are separate. There is a seem at the waist where they join.
The skirt is NOT one piece, split in front and back, but actually FOUR pieces, over lapping at the waist (think like flower petals) The front two panels line up with the bodice at the center front. They wrap around Arwen’s sides and overlap the back two panels. The back panels meet at the center back.
The front panels are rounded upward in the front.
The skirt panels in the coat all seem to fall just below the muscular part of the calf. Repeat: The skirt DOES NOT get longer in the back!!

Here you can see the back and front panel on the left side. The front panel is flipped over the back, toward the ’horse’s’ rump. You can also see that she has maroon colored riding breaches on, and knee high socks under her boots!

Other then the odd looking boots, this is the best pic I could find of Arwen’s back. (Naturally, you never get a star’s BACK on camera….in this case)
I’ve lightened the picture, and you can CLEARLY see the split between her back panel and front panel on her right side here. You can also just barely see the back panel on the left side meeting and slightly overlapping the right rear panel.
You’ll note the front right panel overlaps the back right panel, and they stay at the same length.

This is Jane Abbot (Liv’s riding double) on a real horse in the real costume. You can see the split between the front and back panels right above that drape of underskirt.

This is a great photo from the display, and you can see the slight rounding in the front two panels here.

Here you can see the split between the front panel and back panel on the left side… and Liv’s lovely white socks again!
(also, check out that AWESOME comparison/saddle blanket her ‘Horse’ has…as costumer and horse person…I WANT ONE!!! Have to appreciate that embroidery and lovely shape!)

Based on the way the back panels are falling here, it might be possible that the back left side slightly overlaps the back right.
The bodice of the coat is almost identical to the bodice of a Elizabethan court dress.
The shape is similar to this bodice

This is Elisabeth Swann’s Plum dress from the Pirates of the Caribbean Curse of the Black Pearl. (which I intend to make one of theses days…:p)
The shape is not as elongated in the Chase Dress, But it is the same principle…straight around the natural waist, pointed slightly in the front, opening and fastening down the front.

Here you can see the point in the front.
The Bodice is 5 pieces.
The two front panels.
The two side front panels
the back panel (single panel).
The side back panels.
(Yeah, like I said…this is a CRAZY dress)

The Sideshow collection I have found to be largely accurate, though (at least in this figure) they lack the other skirt panels and the side back panels of the bodice.
BUT is it a great picture to see those front four panels and the way they pull on each other. Also, note decorative baseball stitching over the side front seems.
The front side seems are princess seems. They come over the bust and then go to the edge of the shoulder seem. They come straight down.

The point at the bottom of the bodice starts just before the end of the side front. You can see the slight slant to the very bottom front of the side piece.


You can see the side back panels here and they have baseball stitching as well!!


The two pictures above are lovely shoulder seem pictures.
The front panels are supposedly fastened with a hidden zipper…It might also be LARGE hook and eyes, like a cavalry jacket or Napoleonic style jacket.

Here’s a bit more of a look at the front panels/ decorative stitching/ hidden zipper


The Collar!!
The collar makes this dress even more fantastically crazy!!
It is NOT a separate piece of fabric - it is part of the front panels, sewn together at the base of the neck in the rear and sewn down the shoulder seems.
Like this

This was an original dress that I designed, but the collar is the same style as the Chase dress. It’s actually quite simple and lovely to make.

Look at the way it folds and stands up.


You can see here that the collar stands up nearly to her chin.

Here you can see where the seem starts at the rear of the collar (where it is sewn into the back of the bodice) as well as the shoulder seem
And…of course there’s that lovely bit of lacey stuff on the tabs of the collar. I have no clue what that is. I would hazard a guess that it could be some string that may have been formed then sewn in, or some very unique fabric. It’s sewn like facing as it clearly goes down along the center split.
The Sleeves..
The sleeves are actually FOUR pieces… PER SLEEVE.
A ‘shoulder roll’ (its almost a tiny cap sleeve), a top part and a bottom part…and an inner sleeve

In both pictures above, you can see the tiny little ‘cap’ sleeves just above Arwen’s shoulder. They’re very small, very subtle. Almost lost in most of the pictures from the set, unless you know what you‘re looking for.
They are separate pieces, sewn in at the top of the arm hole. They DO NOT go all the way down the arm holes.

This is actually the best picture I could find that showed her ‘cap’ sleeves. They lost in the rest of the sleeves most of the time.

The top of the actual sleeve is sewn into the arm hole. (The cape sleeve is all in the shoulder seem) The seem is on the inside. The bottom part of the top sleeve is rounded almost to a point over her elbow.

Oh, you can see the cap sleeve pretty well in this one too!

Here’s a zoom of a display pic. You can see the ‘cap’ sleeve up there, the nice embroidery (It looks like it was done in a very light gray or white, probably on a machine)
AND you can see the slant of the lower part of the upper sleeve right there toward the bottom of the pic.


This is the best reference I could find to the embroidery on Arwen’s sleeves. This would be the RIGHT side. The little ‘wing’ bit there faces the front of the dress.
The lower sleeve is petal wrapped (overlapping) at the seem and then falls free. The bottom edge is slightly rounded. It falls about three inches below the outstretched fingers.
See that petal wrapping in the pic on the right?


The inner sleeves are a very light, sheer material. (possibly the same that was used for Arwen’s veil in her mourning dress) - you can see her gloves right through it

They are very crinkled. I would tend to guess this is natural, not pressed crinklation, and I doubt the inner sleeves were dyed to leave them crinkled like that.
They are sewn in with the lower sleeves at the elbow seem

You can see the seem here. They are rolling up Liv’s sleeves to lace on her gloves. You can also see that they have been gathered slightly at the seem.

Here you can see the inner sleeves are straight cut and fall to the knuckles.

The skirt
Is a few shades lighter gray then the overdress. It looks to be made of cotton or some lighter material. It may even be silk, as many of Arwen’s dresses lower layers are silk.

The underskirt falls about four to five inches above the ankle. It hangs about five to six inches below the coat. It mirrors the rounded front and straight back of the coat.
Like the Coat, the underskirt is four pieces, HOWEVER the front and back panels are sewn together on each side. You can see the sides of the skirt hanging down on either side of the ‘horse’ below.


This is Jane Abbot in action. You can see the seem there on the right side of the underskirt as it billows out.
Also, again, check out that AMAZING comparison!! I WANT ONE!! (Christmas, please!!)
The Underskirt is sewn into the coat at the waist.
The Gloves!!
(I love gloves!!)
These are custom-made gloves and I have no doubt they are the softest doeskin leather.

The gloves are the same dove gray as coat.

You can see from this picture that the gloves come over the elbow and lace up.
The picture below, (less then flattering to Liv, but a great shot of her gloves) shows a bit of the lacing down the inner side of the glove.


The thumb is separate from the hand. Like any good pair of gloves.
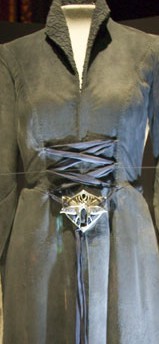
The belt/buckle
Arwen’s ‘belt’ is a bit of ribbon, about three inches wide. It is a few shades darker then the coat.


In the pictures above you get a nice idea of what the ribbon looks like. It is threaded through loops sewn into the princess seems between the front panels and the side front panels. Three on each side, spaced about an inch and a half to two inches (or as the wearer’s figure calls for) apart. They start under the bust.
The belt must be unthreaded each time the dress is taken on or off.
It falls to just above the knee. The lacing starts under the bust but not tight under the bust like a corset. It ends at the natural waist.
All the pictures of the dress on display have the ribbon crossing right side on top of the left.
There may well be six foot of ribbon there.
The knot and buckle fall over the “v” in the bodice.

Isn’t the buckle glorious though? It looks reminiscent to some of Arwen’s other crests/patterns.
I can’t really tell you much about this one, regretfully. There are simply not enough pictures of it.


Unfortunately, these are the best photos of Liv in the dress front on…is seems Frodo is always in the way, strangely.

This is a lovely sketch of the buckle (not done by me)

Here’s a look at a very well done replica. This one ran about $100 USD
Boots
I‘m seeing a couple different things in all my research.
First, there’s these things. What the heck is that? It looks like a pair of slippers my dad used to have!! ??

Next, there’s whatever Liv is wearing here. I’m seeing maroon breeches with tight white or cream socks and slouch boots. Hmm…
Then there’s these boots. Which appear on the feet of Jane Abbot, for the ridding scenes.


And here we have the concept design and a replica statue boots. Which both bear remarkable resemblance to the pair worn above. (Ish)


Finally, we have these photos- both from the display.
So Arwen’s boots. Are rounded toe, laced up the BACK. No heel. They are fitted. Made of suede.
Color…dirty dove grey.

These I LOVE. They are a replica pair made by a fan - a friend sent me this pic, so I sadly do not know who made them or I would credit them. And give them a bit of business.
The breeches
Most people credit them as maroon. I disagree, but cannot contest this with any photo evidence: only logic.
Arwen has a pair of maroon breeches. Yes. She wears them with her maroon battle dress.

You can also see a pair of boots there which may or may not be the ones shown above.
Here Liv IS wearing a maroon pair of breeches…with those knee high socks and slouch boots. I doubt those are the correct undergarments!


In both photos above you see Liv in her chase dress wearing her maroon breeches….HOWEVER…I will contend very strongly that that background LOOKS LIKE HELM’S DEEP!!! That’s the Deeping Wall, with the stairs that Legolas ‘sleds’ down, and the puddle where Gimli almost drowns.
I think this is just practice for the battle at Helm’s Deep.

And here we have her in a pair of deep blue/dark grey breeches. These do however, seem more of a likely color.

Lastly, look at the teeny tiny bit of breeches you can see there above the right boot in the statue. It’s the same color as the coat.
I think that they never made a pair of breeches to go with the Chase Gown. They really didn’t need to. You never see Arwen’s legs. So Liv and Jane just wore whatever they had on hand. Thus the maroon breeches from the Battle Gown.
Hadafang
Pictures only.. Swords are slightly beyond my range of making!


The shape of the blade, hilt and pommel are off here….but it’s a cool picture anyway.


These are clearly from Helm’s Deep, but you can see the distinctive shape of Hadafang none the less.

This is the BEST picture of Hadafang with Arwen. It was as teaser poster for Return of the King, and Arwen wears her Reforging Gown and cloak here.
(She was the original presenter of Andril to Aragorn (instead of Elrond), thus the picture with the sword, but the scene was filmed, cut and changed)

And I love this picture. Liv had fun with her blade, I think. They seem to grow on people! If you’ve ever had a sword in your hands…you know what I mean.
MINE
First off, I am making two Chase Dresses….a “mock up“, or practice dress (so I can get all my seems and problems worked out) and the my “Real” Chase Dress…my “Precious” ;)


So the following pictures are currently of my mock up dress, or my fake dress as my brother likes to call it. (He also likes to point out that it is Hulk and Loki green)
As soon as I get my real dress done (hopefully sometime in the next few months) I will get the pictures of that added to this blog. (STAY TUNED!!)
MATERIAL
For the pictures you are seeing now, I used a two shades of green cotton (‘Hulk’ or Kelly green, and ’Loki’ or Forest green) and muslin for the inner sleeves.

For my final dress I am going to be using a sky blue suede cloth, dark blue satin for lining, deep blue silk or linen for the underskirt, and something very sheer for the inner sleeves…haven’t decided what yet.
WHY not a grey?? Because I’m a strawberry head (Both red and blonde) and I look better in green and blue then grey. (Plus I couldn’t find a satisfactory grey in suede cloth)
SEWING
I used a combination of several patterns and a great amount of add lib.
For the bodice of the dress I used Simplicity 3782, an Elizabethan court dress. The B pattern has a bodice that has roughly the right shape and a PREFECT collar. The problem is it calls for a corset.

I combined the bodice front from that pattern and the side panel of a dress from Simplicity 9891 to make a new pattern for my chase dress…which has the correct princess seems.
(I know….I do honestly have a life!!….I work with knights! Really!!)


The bodice came together fairly simply once I had my pattern perfected (I did mock up a bodice before making my ‘fake’ dress to make sure I had it right)
One discovery I made was that the next bodice will be cut larger to fit over my hips, because the skirt takes up a lot more space then I anticipated.
The collar was actually fairly easy, once I knew what I was doing. It turned out lovely, in my opinion. I did add a layer of very stiff interfacing.


The hardest part of the bodice was getting my belt loops in the princess seems. I basted the bodice together, undid the seems below my bust and sewed in my loops. Given that I’m about a foot shorter then Liv Tyler, the loops are closer together then on her dress….it’s important to size everything to your own body, after all.


To make the loops, I sewed up a long strip of fabric and cut it into six three inch pieces. It was actually not as hard as it sounds.
And believe me, it get’s worse. :P

I opted for large hook and eyes to fasten my dress. The though of a zipper just wasn’t cutting it for me. I spaced the hook and eyes about an 1¼ apart. I personally think it looks perfectly find.


The sleeves were next on my list.
The little cap sleeve and upper sleeve came from Simplicity 2172 (A Steampunk styled jacket, corset and skirt). The lower sleeve and inner sleeve came from McCalls MP273.


I took the little cap sleeve from 2172, traced it and shrunk it to about half the original size…and it was still too large it turns out.
I sewed the cap sleeve into the top of the arm hole. It looks pretty cool.


As you can see, they practically blend into the rest of the dress. So I feel I brought justice to the little cap sleeve! (In that they match Arwen’s almost perfectly)
The upper sleeve posed a bit of a problem to me, in that it’s a bit tight when raising my arm over my head. Not a problem unless you plan on wearing the dress and being active in it. Which I do…
I’m looking at possibly adding a gusset to my next dress.
The lower sleeve is self lined, which gives it the nice square look that Arwen’s sleeves have.
I basted the upper sleeve in, then cut the slant at the bottom, took it out and cut my lower sleeves to match…


NOTE!! -- cut the sleeve from the top like this -- cutting it other ways will end disastrously!!! (as can bee seen by that UGLY and unseemly seem straight across my sleeve just below the cut. That’s called ‘the store is out of your fabric so you make scraps work’ :p) (Since when has a fabric store been out of COTTON?!)
The cut does make it slightly difficult to sew the two pieces together, but it does work!
Once the lower sleeve was attached, I sewed up the arm and sewed the entire sleeve into the arm hole on the bodice.
The inner sleeve got cut down a bit, roll hemmed, and then sewn into the seem where the upper and lower sleeves meet (By flipping the lower sleeve back over the upper one)

Thus I had sleeves.
(Truly, most exciting!)


And thus began my greatest frustration with the dress…the skirt.
I cut the skirt panels about a foot wide, and three foot long. (Based on my height!!) (About three and a half for the underskirt…I did cut everything down before sewing it into the dress) From there I rounded the front corners of the front panels and sewed them. All four panels of the upper skirt are self lined. Again, this gives them the nice square look that the original dress has.


The two front panels went in first, then the right back one, then the left back. This created the overlapping look in the skirt panels.
Unfortunately for me, my sides were uneven at my first try, so I had to rip them all out and re-measure, re-cut, and re-sew.

I apparently cut he right rear panel with a curve at the bottom, so it does not match the left side in the rear. One more mistake not to be repeated on the next dress!!
Once I was happy with the over skirt, I moved on to the underskirt, which was (thankfully!) much easier.
I cut four panels, rounded the front two, and sewed the two sides together. Then I roll hemmed the two skirt pieces and sewed them into the waist.
I bought three and a half yards of green, 3” ribbon for the belt and used about 2 and a half yards of it.
I have yet to find myself a buckle, but that will be an adventure for another day!! :D
So Here I am, in all my green glory!
(I did a photoshoot a few days ago…got some AWESOME pictures that I will post as soon as I get the finished version…so until then, enjoy those below and STAY TUNED!!)


Oh, incidentally…I found that through the process of making my Chase Dress I inadvertently made some lovely new hats!!


My mother feels I should purse millinery. My brother says don’t count on it.
Hope you enjoyed, and feel free to contact me with any questions!
Namárië! Nai hiruvalyë Valimar.
Nai elyë hiruva.
Namárië!!
Nai truantel ar varyuvantel i Valar tielyanna nu vilya!!
Namárië!!